Self Portrait project
PART ONE: Continuous Contour Self-Portrait

|
|

|
Instructions
Using a photo of yourself, with a clear view of your face, neck and shoulders, use a regular HB pencil to do multiple sketches in the style of continuous contour.
Create multiple sketches and choose your best (of at LEAST 3) for the next part of the project. Don't be afraid to try new things!
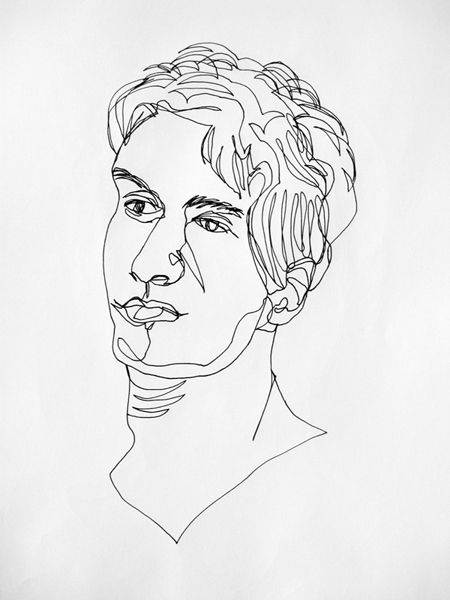
What is continuous contour?
This is a style of drawing that focuses on the movement of lines and the outlines of figures to create shape and definition. Keeping you pencil on the paper at all times, you create an image that has lots of movement that show the outline of different features.
Here, we would see outlines of hair rather than shading to show colour, and different lines that both show different shapes for where colour in real life may change (i.e. shadow) or where the artist saw movement or change (like the lines on the sides of the mouth, wrinkles or shadows on the neck, where light is hitting the lips or cheeks).
In our continuous contours we want to focus on what lines and movement we SEE and not what we think or want to see. We NEVER use an eraser, we don't shade or colour in, and we embrace lines where we wouldn't normal see them. "Messy" can be good!
Using a photo of yourself, with a clear view of your face, neck and shoulders, use a regular HB pencil to do multiple sketches in the style of continuous contour.
Create multiple sketches and choose your best (of at LEAST 3) for the next part of the project. Don't be afraid to try new things!
What is continuous contour?
This is a style of drawing that focuses on the movement of lines and the outlines of figures to create shape and definition. Keeping you pencil on the paper at all times, you create an image that has lots of movement that show the outline of different features.
Here, we would see outlines of hair rather than shading to show colour, and different lines that both show different shapes for where colour in real life may change (i.e. shadow) or where the artist saw movement or change (like the lines on the sides of the mouth, wrinkles or shadows on the neck, where light is hitting the lips or cheeks).
In our continuous contours we want to focus on what lines and movement we SEE and not what we think or want to see. We NEVER use an eraser, we don't shade or colour in, and we embrace lines where we wouldn't normal see them. "Messy" can be good!
Student Examples to come
PART TWO: Cubist-Picasso Style Self-Portrait

|
|
|
|
Instructions
In this next part, we have to use the continuous contour picture we choose from Part One.
Using this Part One drawing, we draw a NEW picture, both copying the continuous contour and adding to it.
Here is what we are going to add (and focus on):
- MORE Lines
-Exaggeration and Trasformation
MORE LINES: Why more? Are you for real teacher? I did so many lines already!
Ah! Well, we need to see MORE lines where colours may change on your face. Draw lines (continuously) where the depth of your face changes (like from cheek to chin, where your nose has nostrils, where there are shadows on your face and where your neck has shadows). Look very carefully at your picture. Add lines that you ignored before! Embrace the line! Just let it happen! Carpe YOLO!
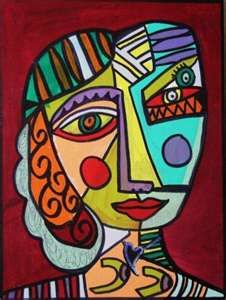
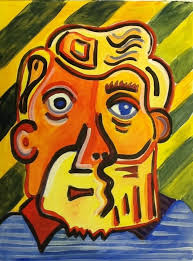
EXAGGERATION and TRANSFORMATION: This isn't English, what do you mean!? Why do you do this to me! :'(
Oh don't fret! What I mean is: Make it Picasso! Make it Cubist! Google "Cubism Portraits" or "Picasso Portraits" to see what I mean. Go with what you feel. If you just want to make one eye upside down, or if you want to rearrange all the features of your face and how it looks, it is up to you! Use your unique preferences and taste to show your individuality Choose based on what seems fun or choose based on how you feel. How can you showcase who are you or what emotions you are trying to show in your picture? Now is the time to get creative!
In this next part, we have to use the continuous contour picture we choose from Part One.
Using this Part One drawing, we draw a NEW picture, both copying the continuous contour and adding to it.
Here is what we are going to add (and focus on):
- MORE Lines
-Exaggeration and Trasformation
MORE LINES: Why more? Are you for real teacher? I did so many lines already!
Ah! Well, we need to see MORE lines where colours may change on your face. Draw lines (continuously) where the depth of your face changes (like from cheek to chin, where your nose has nostrils, where there are shadows on your face and where your neck has shadows). Look very carefully at your picture. Add lines that you ignored before! Embrace the line! Just let it happen! Carpe YOLO!
EXAGGERATION and TRANSFORMATION: This isn't English, what do you mean!? Why do you do this to me! :'(
Oh don't fret! What I mean is: Make it Picasso! Make it Cubist! Google "Cubism Portraits" or "Picasso Portraits" to see what I mean. Go with what you feel. If you just want to make one eye upside down, or if you want to rearrange all the features of your face and how it looks, it is up to you! Use your unique preferences and taste to show your individuality Choose based on what seems fun or choose based on how you feel. How can you showcase who are you or what emotions you are trying to show in your picture? Now is the time to get creative!
Student Examples to come
PART THREE: Adding Colour


|


|

|

Instructions
Before can get to the colour part you need to:
1) Choose your best Cubist/Picasso Style Self-Portrait (You should have done at least 3 to choose from)
2) Use a dark coloured marker or thick pen to outline the lines of your portrait. Where there are sketch lines or "back and forth lines", be purposeful and draw a single line there so you have straightforward shapes
3) Once this is finished, using one piece of blank white printing paper (found by the sink/drawing pencils) trace your outlined drawing with pencil
4) Sign your name at the bottom or on the back of your paper
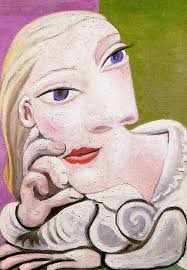
Ok, here we get into the fun part. Adding colour! Now that we have lots of lines, shapes and movement in our pencil picture it is time to add some colour.
Using pencil crayons, you will seamlessly* create depth, meaning and emotion in your self-portrait.
That sounds like a lot of thinking...
Well, really, it is just what you feel. Choose colours you love, colours that "speak to you" Hey, how you doin'?
Colours that tell a story or show how you feel or how you have or want to feel.
Think: what colours show "Happy", "Sad", "Nervous", "Relaxed", "I just ate a giant bag of candy and I'm bouncing off the walls", "I just met Luke Bryan and he let me play fetch with his dog".
Add one of these in different values**, or add ALL OF THEM! The sky is the limit! What looks right to you, or what looks just wrong enough it is right. Just go for it. There are no wrong answers in art, just people who don't follow directions.
*Seamlessly: meaning, you can't tell where you drew the lines, where it begins to ends. It is so coloured in it looks like you did it on the computer.
(SEE PICTURE BELOW)
**Value is "light to dark", when you have just a hint of the colour, or a lot of that colour.
Before can get to the colour part you need to:
1) Choose your best Cubist/Picasso Style Self-Portrait (You should have done at least 3 to choose from)
2) Use a dark coloured marker or thick pen to outline the lines of your portrait. Where there are sketch lines or "back and forth lines", be purposeful and draw a single line there so you have straightforward shapes
3) Once this is finished, using one piece of blank white printing paper (found by the sink/drawing pencils) trace your outlined drawing with pencil
4) Sign your name at the bottom or on the back of your paper
Ok, here we get into the fun part. Adding colour! Now that we have lots of lines, shapes and movement in our pencil picture it is time to add some colour.
Using pencil crayons, you will seamlessly* create depth, meaning and emotion in your self-portrait.
That sounds like a lot of thinking...
Well, really, it is just what you feel. Choose colours you love, colours that "speak to you" Hey, how you doin'?
Colours that tell a story or show how you feel or how you have or want to feel.
Think: what colours show "Happy", "Sad", "Nervous", "Relaxed", "I just ate a giant bag of candy and I'm bouncing off the walls", "I just met Luke Bryan and he let me play fetch with his dog".
Add one of these in different values**, or add ALL OF THEM! The sky is the limit! What looks right to you, or what looks just wrong enough it is right. Just go for it. There are no wrong answers in art, just people who don't follow directions.
*Seamlessly: meaning, you can't tell where you drew the lines, where it begins to ends. It is so coloured in it looks like you did it on the computer.
(SEE PICTURE BELOW)
**Value is "light to dark", when you have just a hint of the colour, or a lot of that colour.

|
Student Examples to come
Rationale Of Final Portrait
Write a paragraph, a few sentences or descriptive point form explaining the choices you made in your self-portrait.
What colours did you use?
Why did you pick them?
What emotions were you trying to show?
What personality were you trying to express?
How is the use of shape important in your picture? (For example, why did you choose a circle on one cheek and a triangle on the other)?
Some sentence starters are:
I chose to use the colour _________ to show _________.
The colour ______________ was used to express ________________(insert emotion or personality trait here).
I used _______________(shapes, design features) to create a feeling of ______________.
I really wants to use ______________in my portrait because it ______________.
